Configuration
Tempo
Vector works with a main tempo which is used to synchronize the movement of the suborbit, sequencing of the Arpeggiator or timing of effects. The synchronization of the individual parts can be enabled or disabled by the switches in the Sync section.
When Vector is playing  , the tempo is indicated by an LED next to the
Tap button in the Sync section. The tempo can be either tapped into the
button or adjusted by pressing and dragging the BPM indicator on the
Effects screen
, the tempo is indicated by an LED next to the
Tap button in the Sync section. The tempo can be either tapped into the
button or adjusted by pressing and dragging the BPM indicator on the
Effects screen  . When Vector is stopped
  , no
tempo is being generated and Orbiter and Arpeggiator are also
stopped.
, no
tempo is being generated and Orbiter and Arpeggiator are also
stopped.
The main tempo operates in multiple modes:
 Stand-alone Mode (default), in which
the tempo is generated by Vector and used only internally.
Stand-alone Mode (default), in which
the tempo is generated by Vector and used only internally. Send Mode, in which the tempo is generated by Vector and
transmitted over MIDI to other devices.
Send Mode, in which the tempo is generated by Vector and
transmitted over MIDI to other devices. Receive Mode, in which the tempo is received from an
external device (such as a drum machine or a sequencer).
Receive Mode, in which the tempo is received from an
external device (such as a drum machine or a sequencer).
Hints
The tempo mode and BPM can be stored persistently on the Settings screen
 . See MIDI configuration.
The MIDI tempo can be additionally slowed down by a fixed divider. See the Global slowdown parameter in MIDI configuration.
Presets
The Presets screen  allows access to presets organized in
categories and pages (with 50 presets per page).
A preset contains all parameters defined on the Orbiter and Effects screens.
allows access to presets organized in
categories and pages (with 50 presets per page).
A preset contains all parameters defined on the Orbiter and Effects screens.
The System presets category contains read-only presets which can change with firmware upgrades while the User presets have space for presets which can be stored and renamed and are preserved during firmware upgrades. There are three pages (150 slots) available for the user presets.
To store a preset, select a slot and press Save. If the slot is not free,
it will be overwritten with the new values.
The Routing lock  button next to the Save button controls
handling of the Routing table.
button next to the Save button controls
handling of the Routing table.
Warning
Do not power off Vector when saving a preset, wait for the confirmation message first.
Hints
The default preset (loaded after Vector is powered up) can be configured on the Settings screen
(see the Miscellaneous configuration section).It is possible to change the current preset by MIDI Bank Select and Program Change messages. The Bank Select chooses the preset category and page while the Program Change loads an individual preset from that page.
Preset import and export
User presets can be stored to or loaded from a USB drive either individually or as a full backup. Only drives formatted to the FAT32 filesystem are supported at the moment.
The external drive connected to the USB Host port can be accessed on the
Presets screen . When a USB drive is plugged in, a third
category External appears alongside User and System.
Warning
Always use the Eject  button before physically
unplugging the external drive to prevent data loss.
button before physically
unplugging the external drive to prevent data loss.
Accessing individual presets
When a USB drive is present, the External category allows access to presets stored on the drive. This method is useful for transferring presets between Vector and a computer.
The category has 5 pages and supports Save, Load and Rename operations in the same way as the User presets category.
Presets on the external drive are stored in a directory named vector-presets
as one file per preset slot. Preset file names are derived from their slot
numbers (shown in the bottom left corner of each slot).
Hint
To copy a preset from User to External, first load the target preset and then save it to a free slot in the External category.
Archiving all presets at once
It is also possible to backup or restore an archive containing all User presets at once. This method is useful for making backups of the full preset bank.
The Backup  button archives all User presets to file named
vector-user-archive.zip.
If the file is already present on the external drive, it is overwritten by the
backup operation.
The Restore  button overwrites all User presets slots with presets
present in
button overwrites all User presets slots with presets
present in vector-user-archive.zip.
Preset slots which are used in Vector but are not present in the archive are
preserved.
Hint
Please note that the preset archive created by the Backup button is stored in a different location than presets in the External category. As a result it is not possible to load only a specific preset from the archive; it is only possible to perform a backup or restoration of all presets at once.
Routing
The Routing screen  enables custom mapping from MIDI
Controllers to polyphonic Parameters.
The routing is stored per-preset so that each preset can respond to an
expressive controller in a different way.
enables custom mapping from MIDI
Controllers to polyphonic Parameters.
The routing is stored per-preset so that each preset can respond to an
expressive controller in a different way.
When a Parameter is connected to a MIDI Controller, its control element on the
Orbiter screen  or Effects screen
is marked by a small wave ~.
In the following example, Suborbit Speed is routed to a controller while
Suborbit Size is not connected:
or Effects screen
is marked by a small wave ~.
In the following example, Suborbit Speed is routed to a controller while
Suborbit Size is not connected:

Routing table
Each Parameter is represented by a single row of the multi-page routing table:
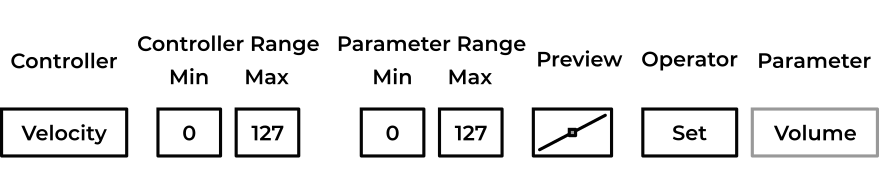
The Controller button selects one of the supported MIDI message as an input for a Parameter (or sets it to Not connected, i.e. not controlled by MIDI). In this particular example, the maximum amplitude of each voice (volume) is controlled by the velocity of Note On messages.
The slope and offset of the transfer function from a controller to a parameter can be controlled using the Controller Range and Parameter Range columns, each with Min and Max sliders. The shape of the transfer function is displayed in Preview. In the example above the mapping is 1:1 and no scaling takes place (note that the range of MIDI messages is 0 to 127).
Moreover, there are three different Operators available for each Controller-Parameter pair:
The Set operator overrides the current position of the knob on the Front panel.
The Add operator adds the controller value to the current knob position. Values less than or equal 63 are subtracted while values greater than 63 are added to the knob position.
The Mul operator multiplies the controller value with the current knob position. This allows to control the maximum possible amount of modulation while playing.
Some of the parameters support only the Set operator (Volume and Pitch) while some only support the Add and Mul operators (the corner parameters Overtone Blend, Filter Resonance and Filter Cutoff).
Hints
A single controller can transmit to multiple parameters scaled in different ways with different operators.
To invert a parameter, set Controller range to 0–127 and the Parameter range to 127–0.
To scale a parameter 2×, set the Controller range to 0–64 and the Parameter range to 0–127.
The dot in Preview is live and shows the current value of the controller, handy for routing verification.
The velocity sent by the Arpeggiator step sliders can be routed too.
Storing and copying
The Routing table is stored per-preset. To store modifications in a routing
table, navigate to the Presets screen , choose a preset in
the User section and press Save.
The Routing lock button next to the Save button allows to
load or save a preset without modifying the current routing. When active,
loading a preset will not affect the current routing table and saving or
overwriting a preset will preserve its original routing table.
The Copy and Paste buttons allow to transfer the routing table between presets. It is also possible to Clear the routing table or initialize it to the Default state.
Hint
To copy a routing table from preset A to preset B:
Load preset A on the Presets screen
(make sure Routing lock is not active).Press Copy on the Routing screen
.Load preset B on the Presets screen
.Press Paste on the Routing screen
.Save preset B on the Presets screen
.
Routable controllers and parameters
The following tables list all controllers and parameters currently available for routing. Some of the controllers are inherently polyphonic (which means the MIDI controller can modulate the parameters independently for each played note/voice) while others are polyphonic only when MPE is enabled.
Controller |
Polyphonic |
Standard MPE function |
|---|---|---|
Velocity |
Always |
|
Key Pressure |
Always |
|
Pitch Bend |
With MPE |
Per-note pitch (X) |
Channel Pressure |
With MPE |
Per-note pressure (Z) |
Modwheel (CC1) |
With MPE |
|
Timbre (CC71) |
With MPE |
|
Brightness (CC74) |
With MPE |
Per-note control (Y) |
CC9, CC16, CC17, CC89, CC114, CC115 |
With MPE |
Page 1 |
Page 2 |
Page 3 |
|---|---|---|
Volume |
Orbiter Offset Y |
Tremolo Depth |
Pitch |
Suborbit Size |
|
Filter Cutoff |
Suborbit Speed |
|
Filter Resonance |
Vibrato Speed |
|
Overtone Blend |
Vibrato Depth |
|
Orbiter Offset X |
Tremolo Speed |
MIDI Polyphonic Expression (MPE) support
When MPE is enabled in the MIDI configuration section of
Global settings , any of the available controllers can be
used to control polyphonic parameters using the channel rotation scheme
(with channel 1 being a manager channel used for global control applied
to all voices).
The MPE standard defines that Pitch Bend is used for per-note pitch variations, Channel Pressure for per-note pressure and CC74 for additional per-note control. However, as some MPE keyboards and controllers have non-standard configuration, the Routing table allows to choose from other source options.
When MPE is disabled, the routed parameters apply to all voices with the exception of Velocity and Key Pressure (polyphonic aftertouch).
Fixed controllers and parameters
Apart from Routable controllers and parameters there is a number of parameters which are assigned to fixed controllers, listed in the following table:
CC |
Parameter |
|---|---|
0 |
Bank select MSB |
1 |
|
2 |
Suborbit size |
3 |
Orbiter centre point position X |
4 |
Orbiter centre point position Y |
5 |
Orbiter width |
6 |
Data entry MSB |
7 |
Lissajous shape warp X |
8 |
Lissajous shape warp Y |
9 |
|
10 |
Reverb amount |
11 |
Chorus mix |
12 |
Delay mix |
13 |
Envelope attack |
14 |
Envelope decay |
15 |
Envelope sustain |
16 |
|
17 |
|
18 |
Vibrato depth |
19 |
Tremolo speed |
20 |
Tremolo depth |
21 |
Drive amount |
22 |
Drive colour |
23 |
Reverb size |
24 |
Reverb colour |
25 |
Global resonance |
26 |
Delay time |
27 |
Delay feedback |
28 |
Chorus speed |
29 |
Chorus depth |
30 |
Chorus colour |
31 |
Arpeggiator note length |
32 |
Bank select LSB |
33 |
Stack volume (Mono) |
34 |
Detune stack (Mono) |
35 |
Glide (Mono) |
36 |
Voices (Mono) |
37 |
Follower volume (Dual) |
38 |
Data entry LSB |
39 |
Suborbit offset (Dual) |
40 |
Stereo bias (Dual) |
41 |
Detune drift (Poly) |
42 |
Stereo scatter (Poly) |
43 |
Orbit Attack |
44 |
Orbit Decay |
45 |
Orbit Release |
46 |
Arpeggiator humanize |
47 |
Suborbit Speed |
48 |
Orbiter height |
49 |
Volume |
50 |
Envelope release |
51 |
Vibrato speed |
52 |
Detune follower (Dual) |
64 |
Damper/Sustain pedal (0–63 off, 64–127 on) |
66 |
Sostenuto pedal (0–63 off, 64–127 on) |
89 |
|
114 |
|
115 |
|
100 |
Registered Parameter Number LSB |
101 |
Registered Parameter Number MSB |
Hint
The Sustain controller holds notes until the pedal is released. The Sostenuto controller works in a similar way but only holds notes which were active when the pedal was pressed.
Global settings
The Settings screen contains global configuration which
is common for all presets.
The configuration can be stored using the Save button, reloaded from memory
using the Load button or reset to defaults using the Default button.
MIDI configuration
The following MIDI parameters can be set in the Global settings:
Input MIDI channel for receiving MIDI messages,
Separate Arp in MIDI channel for Note On/Off events fed into the Arpeggiator (equals to the MIDI input channel by default),
Output MIDI channel for sending MIDI messages (Start/Stop, Timing Clock, and also notes received from connected MIDI controllers if Forward MIDI notes is enabled),
Separate Arp out MIDI channel for sending notes played by the Arpeggiator if Output Arp MIDI notes is enabled,
The option to ignore note velocity and use a Fixed MIDI velocity to play all notes with the same (maximum) amplitude,
The option to divide the received MIDI Timing Clock (depending on the Tempo configuration) by a factor defined by the Global slowdown,
The option to set the Tempo sync mode (OFF for the Stand-alone Mode, OUT for Send Mode and IN for the Receive Mode),
The option to configure the Default BPM used by the main Tempo,
The option to configure MIDI Out as Through so that all MIDI messages received on the MIDI IN jack are forwarded to the MIDI OUT jack, enabling the MIDI Through (Thru) functionality,
The option to configure Pitch bend semitones from 1 to 24 semitones up/down,
The option to Hide MIDI popup notification, normally displayed when a MIDI Control Change (CC) message is received, and
The option to Enable MPE (MIDI Polyphonic Expression) for the Routing table.
Hint
Both Input MIDI channel and Arp in MIDI channel can be set to receive messages on all sixteen channels simultaneously.
Miscellaneous configuration
Apart from MIDI configuration, the Global settings screen also contains the following configuration options:
If Sticky Corner Matrix is enabled, the Corner Matrix button alternates between visible and hidden Corner Matrix. If disabled, the Corner Matrix stays visible only as long as the button is pressed.
The Knob speed selector allows to increase the rate of change of the 25 rotary encoders on the front panel.
The Screen brightness configures the LCD screen brightness in 10 steps.
It is also possible to mark the current preset as default (loaded automatically when Vector is powered up) using the Preset as default button.
Hints
The Settings screen
also allows for
Firmware updates. User presets are preserved during an update.Updating the default preset must be followed by pressing the Save button, otherwise it has not effect.